Food Styling & Photography Workshop ~ Day 1

In September 2009 I was reading MattBites and discovered that Denise Vivaldo of FoodFanatics and Matt Armendariz were teaching a workshop for food writers and bloggers in November. I was absolutely thrilled because it was just what I needed to finalize my commitment to do a food blog. If I went to the class, I would have to justify spending the money. I had taken a catering class from Denise at UCLA in 1995 and knew what a talent she was, and, of course, Matt has his great, very popular blog with his magnificent photography. This would be my chance to learn from the best.
I procrastinated signing up for the class, and the next time I looked it was full. I almost had a heart attack. I wanted to cry. A week went by and I looked again, only to discover that so many people had signed up that they were adding an additional class the following weekend. I called Denise immediately and signed up, thanking my lucky stars that I would now be able to attend.
On September 14th I bought my Canon T1i digital camera, because I knew I only had two months to learn how to use it before the workshop. I knew there were going to be people there who had real blogs already and I was worried about looking silly. I also knew we would have to create our own food set-up on Sunday to be photographed, and I had no clue what I would do. Butterflies in the stomach.
November 14, 2009
It was 9:00 Saturday morning. Matt’s studio in Long Beach was in a row of like-studios, with a regular door and what appeared to be a double garage door next to it. I knocked on the door, and when I went in Denise rushed over and gave me a big hug, exclaiming, “Lynne, your hair is all gray and curly! I love it!” She hadn’t changed a bit!
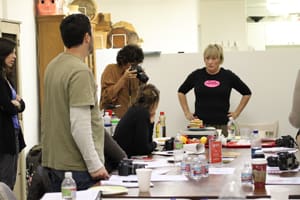
Little by little the other 10 participants arrived and we all sat around a big table in the middle of the studio. We started off by introducing ourselves and sharing our stories. Several people already had blogs, some were planning on starting their own, and all wanted to improve their food photography. They were such a friendly, talented group including Cheri from Adventures in the Kitchen, Gaby from What’s Gaby Cooking, Miri from LauraCarmen and Lisa from DandySugar.
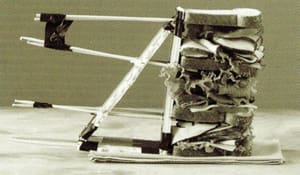
Denise began her introduction to food styling by declaring, “Food left on its own can be tricky, ugly and mean.” She said food styling was an American invention and was really about engineering. Then went on to tell about a photo shoot of a very tall sandwich she and her partner, Cindie Flannigan, had worked on for the cover of their book. The sandwich wouldn’t stay upright and she was tearing her hair out. So she went to lunch and when she came back, Cindie had built scaffolding on the back of the sandwich from rulers, chopsticks and electrical tape to hold it up.
Photos by Jon Edwards Photography
Denise introduced Cindie Flannigan to us, saying Cindie was the best food stylist she had ever worked with. Denise said Cindie could make the worst ugly food look beautiful and when she died, she wanted Cindie to style her face for her funeral. I think Denise must have been a stand-up comedienne in a former life because while giving us an immense amount of information on food styling and her vast career experiences, she kept us laughing every minute. “Twenty years ago I looked like Barbie Benton,” Denise quipped, “Is she still alive?”
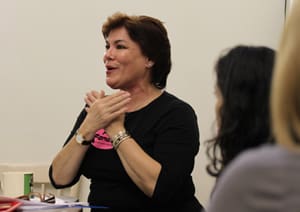
Denise Vivaldo
Cindie and Denise had their demonstration area set up at the head of the table. The first demo they did was pancakes. Cindie demonstrated the different look of the pancake if it was cooked in oil or in butter. She stacked the pancakes up and stuck little triangular makeup sponges in between so they were straight. The maple syrup was frozen so it ran languidly down the side of the stack.
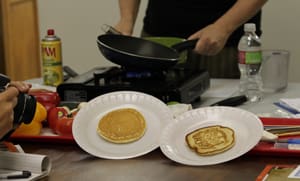
Oil (left) and Butter
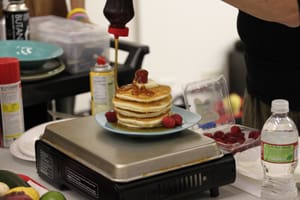
Applying the Frozen Syrup
Photographing the Finished Pancakes
More food styling tips:
- Undercook the food so it doesn’t appear shriveled
- Food styling is piecemeal – cook components separately and then assemble on the plate
- Use small plates – you don’t want Barbie & Ken food, like 2 acorns on the plate
- Know what you’re selling – is it the china or the cake
- Scotchguard the top of food to repel liquid
- Have soup cold — prop up the garnishes with ice cubes or a potato cube with toothpicks
- Spray Pam on cut potatoes, apples and avocados to prevent turning brown
- Wear cotton gloves to keep fingerprints off props
- Cover your finished styled plate with wet paper towels called the “bumper”
- The finished product is called the “beauty shot”
- Rubbing alcohol or vodka dissolves unwanted fat and protein smears on the plate
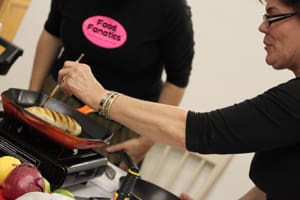
Next we got a demonstration on preparing a chicken breast, which was barely cooked in a grill pan, so that it remained rounded and pretty. Then Cindie and Denise reburned the grill marks with a charcoal starter element, painted it with Kitchen Bouquet, used a torch to cook the sides and melt the cheese, and sprayed everything with Pam. A beautiful photo was taken and then the dish was covered with the wet paper towel “bumper.” At the end of the day, hours later, the wet paper towels were removed and it looked exactly the same as it had earlier in the day! Very useful if your photographer had missed his flight.
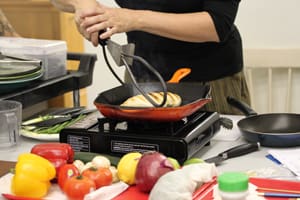
Charcoal Starter Element Applied to Grill Marks
Painted with Kitchen Bouquet
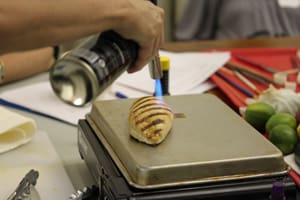
Lightly Torched For Color
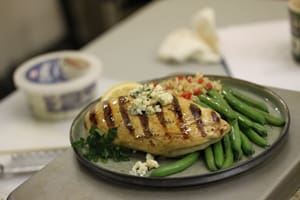
Voila! The Finished Dish
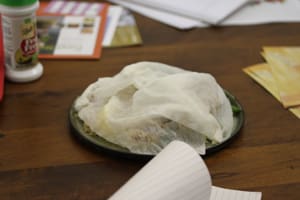
Safely Under the Bumper For The Day
Denise demonstrated creating a pasta dish using jarred Cheesy Ragu. She said you would never actually eat Cheesy Ragu, but you could make it look like any sauce you wanted by adding Kitchen Bouquet, ketchup or other coloring. You used a squeeze bottle to apply it and no matter what you did, it stayed where you put it.
Squeezing on the Cheesy Ragu Sauce
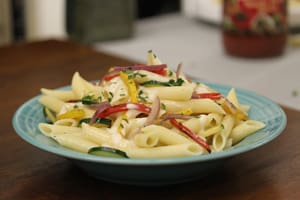
The Finished Pasta Dish
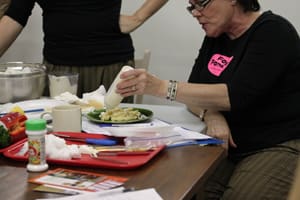
Then on to the hamburger demo. The hamburger patty was lightly sautéed, then torched around the edges and painted with Kitchen Bouquet. The top of the bun was hollowed out and its edges carefully trimmed with scissors. Denise glued on some sesame seeds in bare areas. The ingredients were assembled and it was ready to shoot.
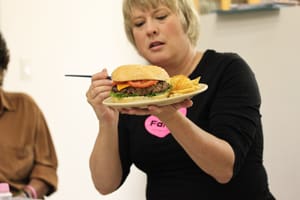
Cindie Puts the Final Touches on the Hamburger
Finally, Matt gave us an overview of what we would be doing the next day in the photography seminar. He showed us on his computer monitor the final photographs from the participants from the previous weekend. The photos were just amazing and inspiring, and I still had no clue what I was going to do for my setup.
I asked Cindie if she could help me figure out what I could photograph, so we looked at some cookbooks that Matt had in the studio. I liked an ice cream photo I saw, and decided my photo would be of raspberry sorbet. Cindie helped me pick out the glassware, the linens and the spoons. There were so many props to choose from in Matt’s studio, it was overwhelming. But Cindie, with her experience, knew exactly what I needed.
It was 4:00 and I was exhausted, my brain was giddy from processing all the new information, but I was ready for tomorrow.
Photo by Lynne ~Beautiful Food Styling by Heather Gill
See my next post about the photo shoot on Day 2 with Matt, Denise and Cindie.
9 Comments
Leave a Comment
Welcome to Cook & Be Merry
 Hello! My name is Lynne Hemer, and I am a woman obsessed with food and cooking, in search of new, unusual, exotic, and sublime ingredients and recipes. I love reading cookbooks, taking cooking classes, going to restaurants, photographing food, and blogging about it all! I hope you enjoy my website as much as I enjoyed creating it.
Feel free to contact me at lynne@cookandbemerry.com
Search Cook & Be Merry
Most Popular Posts


Categories
Archives


Recent Posts
L,
What a nice post -AND your blog is fabulous!
Not surprised -anything you set your mind to -you can do.
I am very proud and happy for you!
xo
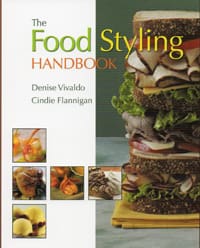
I WANT A COPY of the Food Styling Handbook! Will try to attend the workshop too. Hugs, Jewels xo
so inspiring! i’m attending in march, and canNOT wait! looking forward to your account of day 2.
Lynne,
I love your blog. Your photos are gorgeous and your stories are fun.
What a great way to combine your love of food and photography.
A very nice and informative blog indeed 🙂
I really enjoyed reading your post. It has some very nice tips, but it also boosted my morale: maybe my food photos don’t look professional because the food is real and ready to eat :-). I’m heading off to browse other pages of your blog!
Hi
I like your website very much, I also have a special Chinese food website, and could we exchange website link each other?
Thanks!
Great tips! I really need them I never knew that is how they got those lovely grill marks on the chicken 🙂
Hi
A great reference for studying food photography.
Thank you so much Master 🙂