
The original reason for making these chocolate shards was to embellish the top of the Grasshopper Cream Cheese Pie that I was planning on making. I wanted something on that pie that was sort of a show stopper and really photogenic. My fantasies were just pie in the sky, you might say.
In reality, these chocolate shards were a pain in the butt. I didn’t temper the chocolate and I was working in my kitchen when it was 95 degrees outside. After about 5 minutes, the shards started to soften, so I had to put the whole project into the fridge to harden up. Then take them out and continue with the Pie shoot until the shards started to droop. Then back in the fridge. Repeat. Ugh.
I do not recommend making these shards unless: 1) you know how to temper chocolate; 2) you have cold hands; and/or 3) your kitchen is cold/air conditioned.
But, just so you know, this is how I made them:

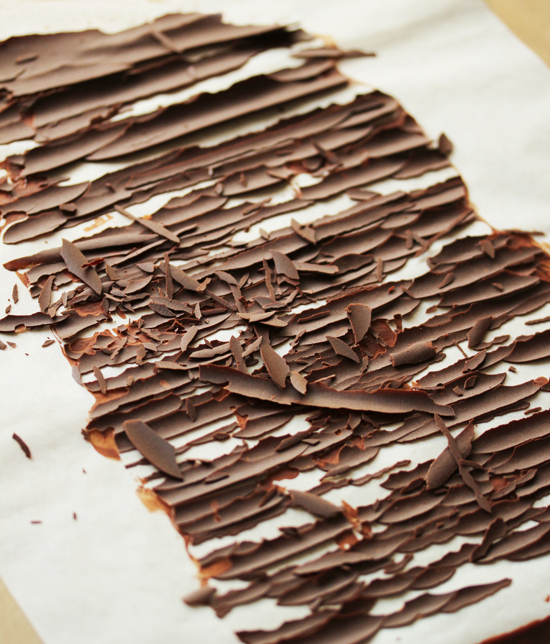
I melted the chocolate in the microwave and spread it on a sheet of parchment paper with an offset spatula.

I covered the melted chocolate with a second sheet of parchment and smoothed it out with the palms of my hands. Then rolled it up into a tube and fastened it with paperclips. Into the fridge overnight and when it was unrolled, there were the coolest shards I had ever seen.
However, as relationships sometimes do, what seemed perfect in the beginning slowly degraded as time went by. That’s just the way things go sometimes.
 Print Recipe
How to Make Chocolate Shards
2-3 ounces semi-sweet baking chocolate (I used Ghirardelli)
2 large pieces parchment paper
2 large paper clips
Small offset spatula
Small rubber spatula
Medium microwaveable bowl
Baking sheet pan chilled in fridge
1. Break chocolate squares into pieces into bowl.
2. Microwave for 30 seconds and stir with spatula. Continue microwaving and stirring at 30 second intervals until most of chocolate is melted and a few solid pieces of chocolate remain.
3. Remove from microwave and stir until all pieces of chocolate are melted and chocolate is smooth.
4. Spread melted chocolate on one parchment on hard surface. Spread to large rectangle about 1/8-inch thick or a little less. Leave about 2 inches clear around edge of parchment.
5. Cover chocolate with second piece of parchment and smooth with palms to even thickness.
6. Starting on short end, roll up parchment to about 1 ¼-inch diameter tube. Secure ends with paper clips.
7. Refrigerate for several hours or overnight until chocolate is hard.
8. On hard surface, unroll chocolate tube. Remove top piece of parchment. Chocolate will be broken into shards as it is unrolled. Use offset spatula to loosen any stuck to parchment.
9. Place parchment, with shards, on chilled sheet pan. Hold in fridge until ready for use within one day. Or store in air tight container in fridge for longer storage.
Note: This chocolate is not tempered. It is affected by warm room temperature. Handle as little as possible with warm hands.


![versatilebloggeraward[1]](https://cookandbemerry.com/wp-content/uploads/2010/09/versatilebloggeraward11.jpg)
{ 1 trackback }
{ 4 comments… read them below or add one }
You are a braver woman than i, making these when it is 95 degrees outside! They look wonderful. At least now it is cooler here in Southern California, so if you make these again soon, it ought to be much easier. I hope you holidays are shaping up well. Buone feste!
LOL I have always wanted to make chocolate shards, but didn’t for the very reasons you described. I feel your pain.
Thanks for this informative post- I can’t wait to see how the chards look on your Grasshopper Cream Cheese Pie which (I hope) will be presented soon!
Ok, you talked me out of them, Grasshoppa (not that I was planning on making them). They look cool, though!