
I get such a kick out of making miniature decorations for my baking projects. One of my favorite are these little bumble bees made with buttercream frosting, chocolate piping and almond slices. I have used them many times to decorate my mini lemon tarts, which I will be posting about in the very near future. But in order to make these little bees, first you have to be able to make a parchment paper cone to pipe the chocolate.
A parchment paper piping cone is a really handy tool to know how to make, because it can be used for fine writing on cakes, or directly on a plate. You could also make them in a larger size and use them for any piping job where a ziplock bag with the corner sniped off is too flimsy, and you don’t need the heavy-duty structure of a pastry bag and tip. You can use them to make chocolate decorations that are piped on parchment paper, hardened and pressed to the icing.
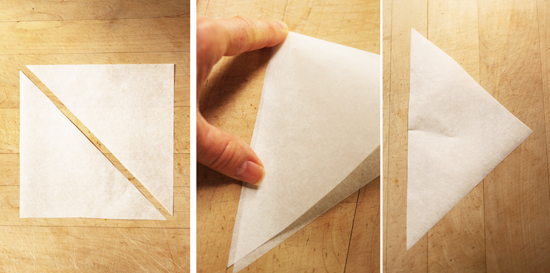
Cut an 8-inch square of parchment and cut it in half diagonally. Put the two end points together and press down on the center, making a small fold to mark the point where the tip of the cone will be.
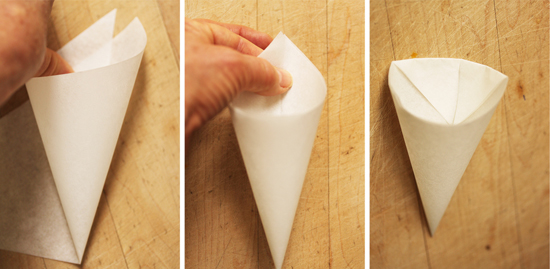
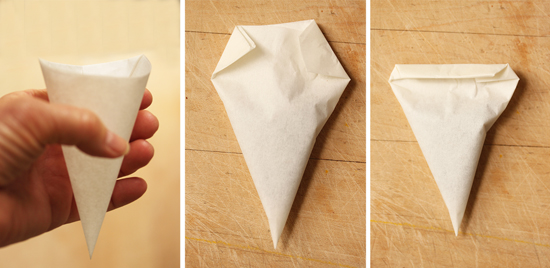
With the long side facing you, curl the right point around to the left inside to make a cone and matching the two points at the top, with the tip of the cone where your mark is on the bottom. Slide the paper around up and down a little, making sure there is no opening in the tip. Then take the left point and curl it around to the right and back, matching up the points. All three points should be in the same place now. There should be no space between the inner and outer cone. Fold the points down into the inside of the cone, so it is even with the rest of the upper edge, to secure the structure. Congratulations. Well done.
Break off a couple pieces of your chocolate, about 3 tablespoons, and put them in the cone. I used a Scharffen Burger Semi Sweet bar, but any semi sweet or bitter sweet chocolate will do. Flatten the top of the cone, bend down the corners and then fold the top over two times. Set this aside until later.
Now you need to make a parchment covered cardboard platform on which to pipe out your bees. I used part of a cardboard box cut into an 8×10” rectangle. It needs to be sturdy, so the thickness of a file folder is not enough. I folded the parchment paper around the board and taped it to the back.
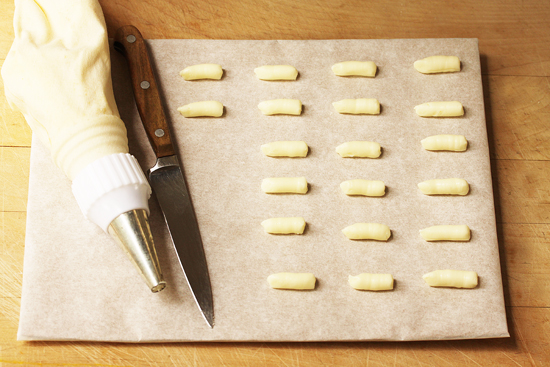
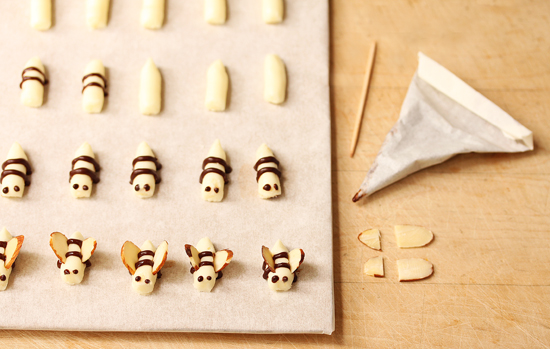
Get your piping bag with a plain ¼-inch tip ready. Make the buttercream frosting, which is the same used for the Twirly Lemon Cookies I made a few posts ago. The recipe is below, and I have left out the lemon zest so the surface of the bees will be smooth. Pipe 3/4-inch lengths of frosting on the board. Use a knife to slice off the frosting as it comes out to the desired length. I used my finger to round the head end and pinched the other end into a slight point.
Now you will take your piping cone with the chocolate inside and microwave it for 30 seconds on high. Take it out and press it between your fingers. If it feels all melted, good. If not and you still feel a lump, microwave it for about 10 seconds more.
Now this is the tricky part: cutting the tip off the cone. You want to cut a miniscule piece off the tip. Then test it on a napkin or paper plate. If the opening needs to be bigger, cut off another teenyweeny piece. If you cut off too much, you will have to start over with a new cone.
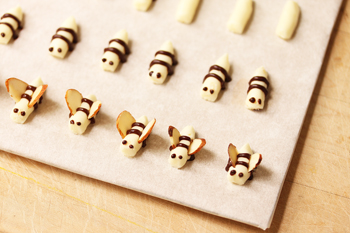
Pipe two stripes across the back of each bee, starting and finishing as close to the parchment as possible. It takes a steady hand, but doesn’t need to be perfect. This is supposed to be fun, remember. Put two little dots for the eyes.
Separate out the good almond slices, trying to match up pairs that are the same size. If they are really big, cut off one end so your bee doesn’t look like a dragon fly. You can see how I cut mine in the photo above. Stick the wings into the body at a jaunty angle. Step back and admire your work. Grin.
Supply List
parchment paper
8×10” piece of heavy cardboard
tape
pastry bag fitted with a ¼-inch open plain tip
frosting, recipe below
chocolate, semi or bitter sweet, bar
sliced almonds, ¼ cup package
 Print Recipe
Buttercream Frosting
2 1/3 cups powdered sugar, plus more if needed
7 tablespoons unsalted butter (1 stick minus 1 tablespoon), slightly softened, cut into tablespoons
1 ½ teaspoon fresh lemon juice, plus more if needed
1 drop yellow liquid food coloring (optional)
1. Whiz the powdered sugar and the butter in a food processor until very little pebbles form. Add the lemon juice and food coloring and whiz until well blended and smooth.
2. Remove frosting to a bowl and mix thoroughly with a spoon to ensure the food coloring is evenly distributed.
3. Put the frosting in a pastry bag fitted with a ½-inch open plain tip. Pipe ¾ to 1-inch lengths on the parchment paper covered board. Use a knife to cut the frosting as it comes out of the bag.


![versatilebloggeraward[1]](https://cookandbemerry.com/wp-content/uploads/2010/09/versatilebloggeraward11.jpg)

{ 26 comments… read them below or add one }
adorable!
How precious! Love the tutorial.
Simply adorable!
Perfectly explained, the recipe is saved.
I have a photo of bumblebees on the blog that could be perfect with your bees:))
These are so cute! I love the directions–I’ve never made my own piping cone, I’ve only used disposable icing bags before. I definitely need to practice my piping skills too 🙂
Scharffen Berger is the best!
Luv learning a new skill! These are adorable and such a great touch!
You are so adorable! Thank you so much for sharing the steps you take to make these babies (I would have been selfish and kept the secrets to myself!) These would be so adorable on a cake or cupcakes. I want to give this a try for my niece’s birthday!
I’m surprised there’s no honey in the recipe! Not only have you been a busy bee, you are quite the artist. As you know first-hand, I am an abstract expressionist when it comes to making something as detailed as your wonderfully clever creation.
Wonderful post Lynn – your tutorial on how to make piping cones is the best I have seen. I have never made those little bees but I am definitely going to have to now – they are just too darn cute!!
These are just too cute. I mean way too cute. Oh goodness not only are they cute they are sweet too! GREG
Lynne, the little bees are SO cute, adorable 🙂
Lynne – these little buttercream bees are adorable! Almost too cute to eat. I can’t wait to read your post about the mini-lemon tarts and how you used these cute little bees. 😉
Love them…these are so adorable… I bet they would make such a great visual addition to Fruit Dessert Table.
Too, too cute! My kids would love these!
In two days I`ll post on my blog such bees too 🙂
this looks so cute!
have a nice time!
Paula
Oh my, those are wonderful! Gorgeous! Splendid! 🙂 Petra
This is such a helpful and informative post! The bees are way too cute!
I definitely will use your adorable bees next events! Thanks for sharing!
These are beyond cute. The next time I decorate a cake, these will definitely be on them.
Awwww….these are sooo cute! I’m definitely going to try this out. And great pics with very detailed instructions. Thanks so much.
Via email: Just found your gorgeous website and made your bees! thank you, they are gorgeous.. was so excited I was successful! my daughter will be thrilled with her beehive cake and honey bee decorations!
Regards
Rebecca
These are adorable, Lynne. Can I make them a day ahead? How to store them and how long they will last once you make them?
Hi Noreen ~ You can make these bees 5 days ahead. Put the cardboard with the bees on it in a 9×13 cake pan and cover it with plastic wrap or aluminum foil. Store in your refrigerator. If you let them sit out at room temperature, the chocolate may melt and smear. I’d love to hear how they turn out. Lynne xo
Hi Lynne,
We had so much fun making the bees! We’ll need practice to make them as perfect as yours, but ours are still cute. We are taking them to a cookie exchange today on top of lemonade cookies! Thank you so much.
Love the post, thanks keep up the good work! Bookmarked!. I really loved the post so I used my Digg account to digg it. tremendous outstanding .
OK, so I know this is a very old post but I just made them!
After some experimentation, I put the stripes on first, then the wings, then chilled, then added the eyes last on cold buttercream (with a toothpick assist). Don’t try to put the wings in on top of hardened chocolate! But I had a hard time getting the eyes to stick onto the room temp buttercream.
I am NOT an artist but they are cute and recognizably bees!
Hi Allison ~ Thanks so much for telling me about your bee adventure. You put a smile on my face! Lynne xo